A new brushing engine that has been rewritten using Metal shaders. It includes an option for “velocity thinning”, where the faster you draw your brush strokes, the thinner the lines.
A new acorn shell tool that you can use to send JavaScript to Acorn, as well as start an MCP server. So if you’ve got a favorite LLM you like to use, you can now use it to drive Acorn. The JavaScript section of the release notes are a good read if you’re interested in that. In addition:
The JS API has also been updated with examples for most calls.
The shell tool has a -jsio argument which lets you do things like: echo "acorn.takeLayeredScreenshot();" | acorn -jsio
Big ML models (used for Select Subject and Super Resolution Scaling) are now downloaded on demand. If AI isn’t your thing, they won’t take up any space on your Mac. If you do use those features, the models are downloaded once and cached, and future Acorn updates are faster because those models no longer ship with the app.
There’s more of course, including bug fixes and QOL things, which are covered in the release notes.
Details on the new brushing engine (kind of nerdy)
The new brush engine is really exciting for me, as it’s something I’ve been wanting to do for years now, and I think I really got it right this time around.
There are two main components to this new brush engine (which I call ”FMVelocityBrush”).
The first collects all the input points for brush strokes and smooths them before painting. If you’re using a mouse for brushing, then sometimes lines get a little jagged. Or maybe you’re moving the cursor faster than MacOS can deliver input, so Acorn has to smooth out those lines. Acorn has done this for decades at this point - that’s not new.
What’s new is the use of a low-pass IIR (Infinite Impulse Response) filter, which smooths the input even further. Once I had that working, the brush simply felt right in a way it never had before. That made me very happy.
The second component is the use of Metal shaders for painting. Previously, Acorn used a handful of Core Image filters to lay down pixels. Even though Core Image itself uses Metal, it was never quite fast enough for this particular workload. Core Image is incredibly fast for most tasks, but I was effectively abusing it by sending it a huge number of tiny rendering requests. Large brushes performed well, while small brushes could be painfully slow.
So now the engine paints the brush strokes using Metal shaders directly, where I have more fine-grained control over what is going on. I even have the brush strokes blend using a custom compositor, so instead of dark fringes when you paint red over green, you get nice perceptual blending. It’s pretty great.
In the past I’ve used straight Core Graphics APIs or simple Core Image filters to paint. I even spent way too much time creating a multi-threaded engine that would take input on the main thread and perform the calculations and drawing on a background thread to speed things up. In a way I’m proud of that one but it never really got me to where I wanted things.
But Acorn’s brush drawing now feels really good in a way it never has before, and I’m looking forward to building on it in the future. The smudge and clone tools also use this new engine - and with the speedup in painting, using the smudge tool is actually pretty fun.
If you’ve been frustrated with Acorn's brushing in the past, give it another try. And let me know if anything feels off with it.
I‘ve just release Acorn 8.5, which has some new features, nice SVG improvements, and some good bug fixes.
Here are my favorites:
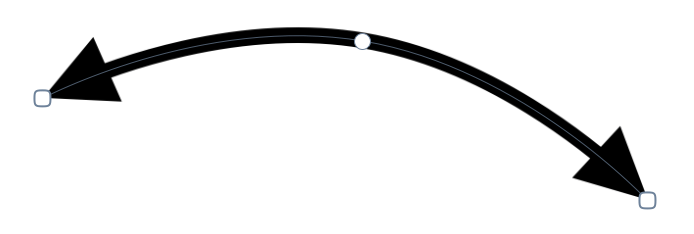
There’s a new “Bendable” type of Arrow shape which lets you add a nice adjustable curve to your arrow. You can also have arrow heads on either end (or both) of the shape. This has been a feature request for many years, so I’m glad to finally add it.
SVG importing has been much improved. Drop shadows, text on a path, poly lines, transforms, reading css colors, and more are all now supported. If you find a SVG that Acorn won’t open - let me know!
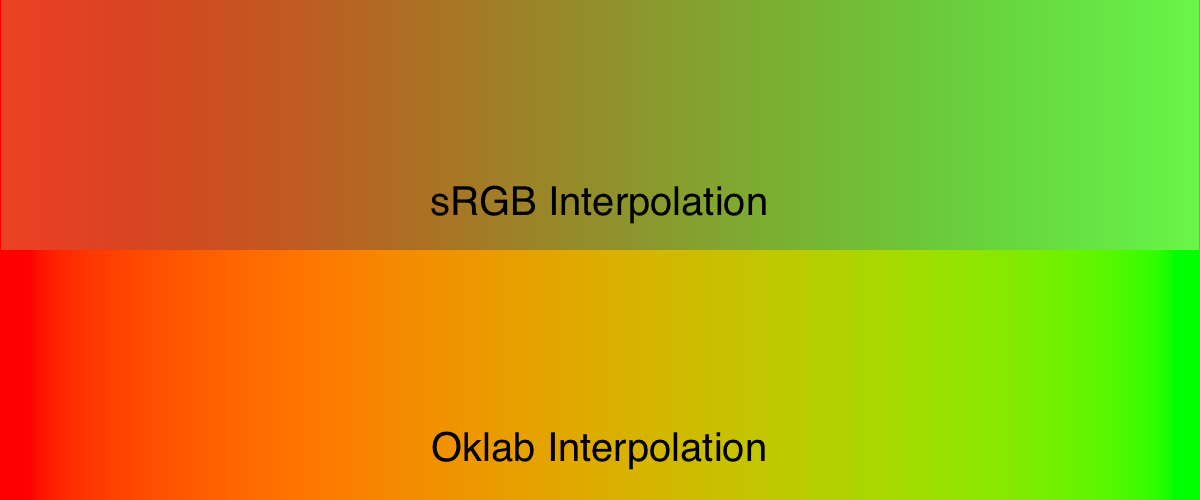
The multi-stop gradient filters now have an option to use the Oklab color space for blending interpolation. What that means is the blending between colors is a whole lot nicer (aka, “perceptual”):
The Oklab interpolation isn’t available with gradients on vector shapes yet, but it’s something I’m working on.
Also new: pressing the option-tab keys will hide all palettes and toolbars. It’s a little thing, but I really like being able to see my image without any distractions. And if you have the “Edge to edge” canvas preference set, it’s great being able to see everything your image just floating there in space, “Letting the content shine” as Apple might say.
Various UI refinements with Liquid Glass and palette things when the canvas is set to edge to edge. There’s more to do here in the future as a general consensus begins to emerge for what Mac apps should look like on Tahoe, so expect more refinement in the future.
As a side note, as of today about 74% of you are using Acorn on Tahoe, 24% on Sequoia, and about 2% on Sonoma.
Acorn 8.2 is out. You can use either the Acorn ▸ Check for Updates… menu item, or use the App Store to update if you purchased it from there. The full release notes are available as well.
Here are my favorite things:
Export Gets Improvements Including Image Diffing
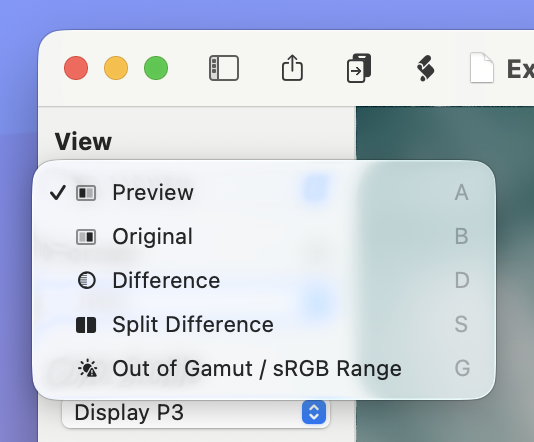
When I wrote the new image diffing features for Retrobatch, I knew I wanted to bring those to Acorn as well. Acorn 8's Export window now has the option to show differences as a highlighted overlay between the original and exported image. I've also brought over the split view as well.
When I wrote the new diff view, I knew I wanted to have it shared between the two apps, and I did a lot of work to make sure all of Acorn's main canvas features went into it as well. So things like overscroll, zooming to where the cursor pointer is, click-drag to move, shared shortcuts for zooming, deep image support, wide gamut support, etc. were all there. It was super gratifying to have that just work.
And that new canvas was so nice, I ended up using it in other locations in Acorn. The RAW Import window gets the new canvas, so does the Image ▸ New View… window. I've even added a mostly hidden new action in the Command Bar called "Compare Two Front Windows" which will bring up a new diff window between two images you have open.
Non-Destructive Linear & Radial Multi-Stop Gradient Filters
This is a feature I've wanted for years, and while I've always had the idea in my head how to do it, I just always kept pushing it off for some reason. At some point this past month, I think I just got tired of seeing it on the list, and finally decided to give it a proper go.
I'm pretty happy with how it turned out, and how performant it is. I even did a bit of extra work to make sure there's some dithering in there for the linear gradient, so you won't get any annoying color banding with certain colors.
Lots of Little Things, Thanks to Some Torn Ligaments
So as I was walking out of the climbing gym a few weeks ago, I stepped off a curb, caught an edge in the ground with my foot, and rolled my ankle. There was a pop, myself on the ground, and a lot of pain. The end result was me moving around on crutches for a while and not a whole lot to do but sit with my ankle wrapped and elevated. (I thought I had broken it, but X-rays said otherwise. Apparently I'm a bit of a wuss?)
So I took the opportunity to whittle away at little things, and even add some of my own personal features.
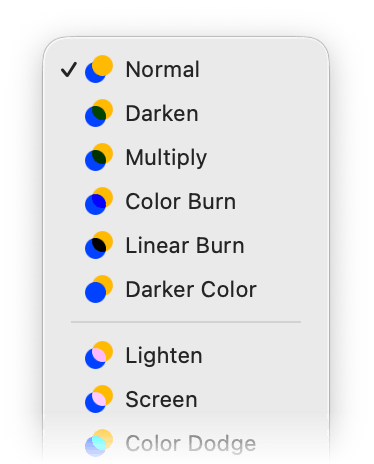
The blend mode popup now shows a little icon next to each item with a little representation of what each blend mode does. This is super informative if you have no idea what some of these blend modes will do.
Smart Layer Export now has an option for shared backgrounds between exported layers.
Command-Option-J is a new shortcut for duplicating the currently selected shape(s). You can also use the Quick Process menu to copy a selected shape a specific amount, but sometimes you just want to duplicate something quickly.
Zoom modifiers when using the panning tool via the space bar. You can now press the space bar and then the command key to switch to the zoom tool (or use space bar + command + option to zoom out).
Acorn will update its selection mode icons when you’ve pressed one of the modifier keys for adding, subtracting, or intersecting the selection (shift, option, shift+option).
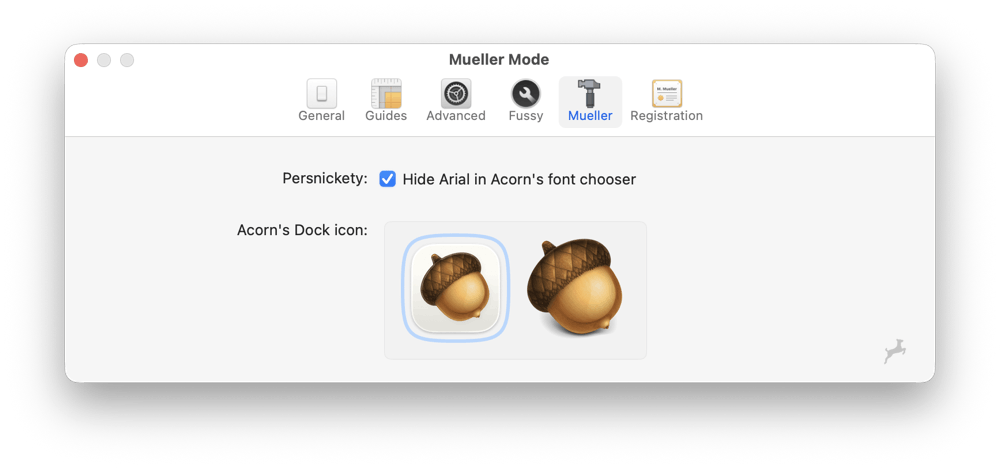
A new preference tab named “Mueller”. This is a little vain, but I often find myself wanting to add little tweaks just for me that I know not everyone will like. These tweaks have mostly come out of working on updates for Liquid Glass (more on that below), and I just felt like there should be a general place to do this. I know an “Appearance” tab might make more sense - but I already have ideas for other things that could go in there.
Who knows (besides me of course) what else might show up there eventually, and it might even go away some day. But for now it's a place where you're going to be able to change the personality of Acorn a little bit. For now there's two options: hiding the Arial font in the font picker, and changing the app icon in the Dock.
File Compatibility
There’s now an option to save a flattened composite of each layer in .acorn files. This is a per image setting, and you can find it in the File ▸ File Info… window under “General”. When enabled Acorn will write a composite of your layer data into the saved .acorn file exactly as it’s rendered on canvas. This includes layer filters, masks, rasterized vectors, etc. This is super useful if you’d like to pull out full-fidelity representations of your layer data—something that’s super easy to do using SQLite: select writefile('/tmp/' || layers.name || '-' || layers.uti || '.png', value) from layers, layer_attributes where layers.id = layer_attributes.id and layer_attributes.name = 'composite';
This is not currently a global setting, since it will increase the size of your .acorn images, but using the following defaults command will turn it on by default: defaults write com.flyingmeat.Acorn8 alwaysSaveLayerComposites 1
I really want it to be easy for other apps to read Acorn image (even Retrobatch!). And with SQLite being the basis for Acorn image files, it's incredibly easy to get that data out.
macOS 26 Tahoe and Liquid Glass Support
Obviously I've been working on macOS 26 Tahoe support this summer for Acorn. While it was relatively easy to get something up and working with Liquid Glass, it's taking a bit more work to iron out all the details and work through OS bugs. Right now Acorn 8 supports macOS 14 Sonoma and later, so I'm not quite ready to leave those folks behind.
If the macOS 26 betas are any indication, Apple still has a lot of work left to make Tahoe amazing. I'm hoping they take their time and wait until later in the fall to ship the next great version of macOS. Acorn is going to take this approach at any rate. My goal is to make Acorn feel at home in macOS Tahoe, but still retain its own personality as well.
I work every day in macOS 26 right now, and Acorn 8.2 is fully supported even in the betas. All of Acorn's functionality is there, even if the UI isn't all glass all the time yet.
Retrobatch 2.3 has been released. Some of the highlights:
Image Diffing: You can now compare your modified image against the original image using new handy new toolbar modes, or keyboard shortcuts.
PDF Rasterizer (Pro only): Convert all vector and text components of a PDF to full page images (handy for folks who want to "bake" their PDFs so text or elements can't be removed to find hidden information).
Send Notification node: Does what it sounds like — send out system notifications for when a workflow starts, ends, or for each image processed.
The Write node now has options to make indexed PNG files. This replaces the dedicated "Indexed PNG" node, so it's all wrapped together in a single node now.
There are little changes and bug fixes of course. The full release notes are available as usual. If you already have Retrobatch 2 installed, use the Retrobatch ▸ Check for Updates… menu item to update to the latest version.
One thing I did, which isn't in the release notes, is the preview canvas got a big upgrade as far as zooming, panning, and deep color support. I did a lot of refactoring when I was implementing the image diffing tools because I wanted to bring that feature to Acorn as well. So with some smart subclassing and such, I've got a shared Metal accelerated canvas that works for both Acorn and Retrobatch. This new class is used in quite a few places in the next release of Acorn (Web Export, RAW Image preview, New View windows, etc), and obviously in Retrobatch's main preview window. It's nice having a fully built out class that can I can just drop in for standard image editing behaviors.
For a .1 update, there are a bunch of new features and improvements. I think I was riding on the high of a great 8.0 release and felt compelled to keep on adding cool stuff.
As already mentioned, Acorn 8.1 includes a new scrub zoom which has been a long-standing request.
Another long-standing request included in 8.1 is the ability to resize selections using on-canvas handles, or via the palette.
Autosave has also had a revamp. There are three options now: "Off", "Native Acorn Images", and "All Images". The default is set to saving native images (.acorn).
In Acorn 8.0 (and previous versions), when autosave was enabled, non-native files (.jpeg, .png) would open without a reference to the original file on disk. This is no longer the case in Acorn 8.1, where non-native files open with a reference to the original file, and pressing ⌘S will save back to the original, regardless of the autosave setting.
Why the change? I found myself wanting autosaving of files where full fidelity would always be preserved (which is what happens when you save .acorn files), but that behavior didn't always make sense when opening a .jpeg file. JPEG files are lossy, so opening and saving the image multiple times would degrade the quality of the image. That's not awesome. And you would also lose the edibility of text and layers.
To make the autosave behavior work with multiple file types took a bit of runtime dynamics, especially since I wanted everything to work seamlessly with the macOS frameworks and versions support. I eventually got there with a bit of help from Dave DeLong, which was much appreciated. I had a solution, but I don't think it was nearly as good as what Dave came up with.
There are also a handful of bug fixes and other improvements that are worth looking over the release notes for.
I've also been regularly updating the documentation, and any changes of note get mentioned in the update log of the docs.
What's next? I plan on giving Retrobatch a bit of attention. It's a fun app to work on as well, and there's always common functionality that can pass back and forth with Acorn.
This is a major update of Acorn, and is currently on a time-limited sale for $19.99. It's still a one time purchase to use as long as you'd like, and as usual, the full release notes are available. I want to highlight some of my favorite things below.
"Select Subject", "Mask Subject", and "Remove Background" are new commands which use machine learning (or A.I. if you prefer) to find the most important parts of your image, and then perform their respective operations. This has been a request for a long time, and while I was doubtful of its utility, it's actually pretty fun to play with and more useful than I figured it would be. So I'm glad I took the time to integrate it.
You can now set your measurement units to inches, centimeter, or pixels, and it shows up across the tools for your image, not just specific ones. This includes the crop palette, shape dimensions, filter settings… well, pretty much everything. This might be the oldest feature request I've implemented so far. And then related to this, Acorn 8 now has an on canvas ruler which you can use to measure out distances, straighten your image with, or even redefine the DPI.
Look up Table (LUT) support. LUTs are pretty fun, and they work by mapping one set of colors to another, enabling consistent or stylized visual effects. LUTs are used primarily in photography or filmmaking, and you can download and install new LUTs from various places across the internet.
Acorn 8 has the ability to read in a CSV file and it'll dynamically swap in the row values and replace text or bitmap graphics depending on what's in the data file. It's like mail merge, but for images. This is pretty awesome if you have a bunch of templated images you want to create.
Acorn has a new "Quick Processor". It's a quick version of the Shape Processor, where you can duplicate shapes, rotate, transform, and apply other operations to them. You can even use snippets of JavaScript to perform your own magic to shapes, including modifying anchors in bezier shapes. I hope to build a little library of cool JavaScript shape filters for this in the future.
OK, now for some geeky implementation things.
OpenGL has been completely removed and Acorn is 100% Metal. This was nice to do, and I was waiting to drop support for older versions of macOS first, but I'm glad it's finally happened.
Acorn's Shortcuts support has been completely rewritten (in Swift) to use the new App Intents framework. Hopefully this puts Acorn in a good place for the future as Apple adds more Siri integration to apps. Maybe someday you'll be able to say "Open up these selected images in Acorn, crop them to 4x3, convert to PNG, save and close them". That's the dream anyway.
Acorn's internal Bézier implementation has been reworked. This was one of the first things I did, as there was a mismatch in the internal API that Acorn used and what it presented on screen. In the classic implementation of Bézier curves you have a start point, two control points (cp1 & cp2), and an end point. But that's not how anybody actually uses when it's presented on screen. On screen you generally manipulate a single anchor, which can represent both a start and end point, and the previous curve's cp2 and the next curve's cp1. Not to mention all the nuances where a shape can have multiple continous paths, or maybe the path is closed or it's still open. So I wrote a fun shim on top of the Bézier "data" which became the new interface for Acorn's canvas to manipulate anchors and such. I backed it all up with tests and this new model ended up fixing some bugs and making the implementation cleaner. It's always a good feeling when you can get something done like that, even if it doesn't really change anything that the customer can see.
And finally, Acorn's documentation has been converted from custom RTF files (and an app named "FMWrite") into Markdown, which hopefully opens up the door for more integration with templates and services. I certainly have been enjoying seeing diffs between revision commits.
Of course there's more. There's always more. Make sure to tell a friend, and even check out the full release notes.
Retrobatch 2.1 is out, and it's a free update for 2.x license holders.
Here's what is new and awesome:
A new Look up Table (LUT) node! (This is my favorite). The LUT node can be used to quickly and easily alter the color and tone of your images. LUTs can be used to create a wide range of effects, from subtle color adjustments to dramatic stylistic changes — it's like a pre-programmed filter, but with more flexibility and control. Use one of Retrobatch's LUT presets, or download additional LUTs that emulate film stocks, create specific moods (like warm, cool, or vintage), or simply enhance the natural colors in your image. You can also adjust the opacity and blending mode of the LUT. Use a grayscale LUT and then dial back the opacity to create some dramatic effects in your images. (Retrobatch Pro only)
New "Tile Chop" node which will take an image and split it up into multiple images based on a width and height set in its properties.
New "Camera Capture" node which uses your Mac's built in camera to take a photo (Retrobatch Pro only).
Photos Export now has an option to export the Current, Unadjusted, or Original versions of your Photos Library images.
*New "Auto Process" option in the RAW Import node. This lets you skip the fiddly options and just lets Retrobatch make the best guess at how the image should be processed.
Two new nodes for renaming files. "File Rename" which will take one search string and replace it with another, and "Web Safe Rename" which will take a sequence of characters and then replace those with a given string. This is handy for tasks where you need to take out special characters or spaces from your images to make them easier for handling on the web.
There's a new Advanced tab in Preferences, with some new options:
A new "Default Write Folder" that will be used anytime you add a Write node.
A "Clear JavaScript console when a workflow runs" option, which is useful for plugin authors.
A "Allow unknown file types" option, which can be used to load ancient file types that MacOS no longer recognizes (Pro only). Find out more about this preference if you find it intriguing.
You can use the Retrobatch ▸ Check for Updates… menu item to get the latest release, or if you have downloaded it via the App Store you can update it from there.
And of course, I've always got more planned so look for more fun stuff in the future.